Reading Knife-Edge Photos
Macro photographs can reveal chips, rolls, burrs, scratches, corrosion, and sharpening consistency—but lighting, focus, scale, and viewing angle can also mislead.
Close-up photographs made with a Canon camera and macro lens can document knife-edge condition before and after sharpening. Useful interpretation requires consistent lighting, focus, orientation, scale, and comparison with practical cutting performance.
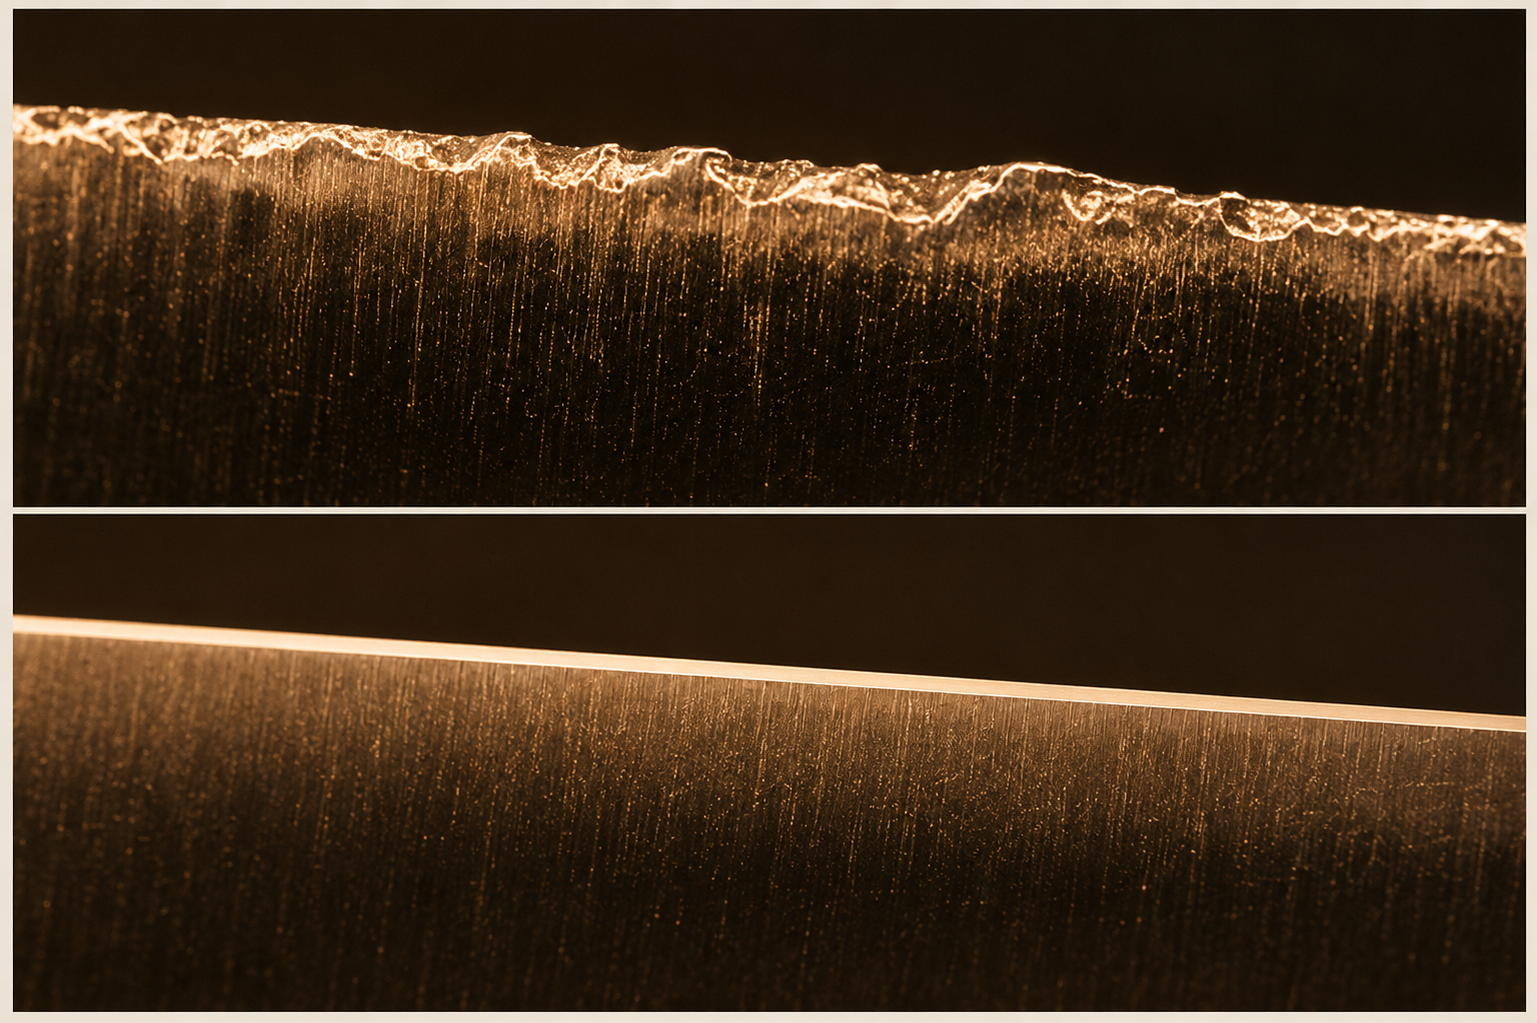
What an Edge Photo Can Show
A close photograph records visible edge features at one moment, under one lighting setup, from one viewing angle. It can support inspection and documentation, but it does not prove cutting performance by itself.
Why Photograph a Knife Edge?
Small chips, rolls, burrs, corrosion, scratch patterns, and uneven bevels can be difficult to evaluate with ordinary eyesight.
At Gibson County Knife Sharpening, close-up documentation is made with a Canon camera and macro lens when additional detail is useful. Photographs can record the knife before service, guide repair decisions, compare the finished edge with its starting condition, and document valuable or unusual blades.
What a Photograph Cannot Establish Alone
Cutting Resistance
The apex may look clean while a thick blade still wedges in dense food.
Edge Durability
A fine-looking edge may still be too delicate for its steel or intended use.
Steel and Heat Treatment
A photograph cannot identify hardness, toughness, alloy quality, or heat-treatment consistency.
Future Performance
A newly finished edge may appear excellent yet roll or chip quickly during use.
Viewing Angle, Scale, and Orientation
The same edge looks different when viewed from the side, directly toward the apex, or diagonally across the bevel. Before comparing images, confirm that the knife was photographed from approximately the same direction.
Close-up photography can make tiny defects appear severe. Whenever practical, include a scale reference, known field of view, or consistent reproduction size.
Photographing both sides helps distinguish asymmetry, burrs, rolls, and reflections that may be visible from only one direction.
How Lighting Changes the Image
| Lighting | What It Can Reveal | Possible Limitation |
|---|---|---|
| Direct light | Reflective flat spots, polished surfaces, and broad edge damage. | Can create harsh glare and hide subtle texture. |
| Side light | Scratches, raised burrs, chipped areas, and surface texture. | Deep shadows may exaggerate defects. |
| Diffused light | More even bevel detail with reduced glare. | Very small reflective defects may become less obvious. |
| Backlight | The outline and continuity of the edge profile. | May hide bevel scratches and surface detail. |
Focus and Depth of Field
At close focusing distances, only a narrow portion of the blade may appear sharply focused. The apex can be clear while the bevel shoulder is soft, or the bevel can be sharp while the apex is blurred.
A blurry area should not be mistaken for damage. A stable camera position, careful manual focus, sufficient light, and an aperture that provides useful depth of field improve repeatability.
More enlargement is not automatically better. A clear, stable, well-lit image usually provides more useful information than a larger but poorly focused photograph.
Dull and Sharp Edges in Photographs
Lighting and focus must be considered before judging either appearance.
Common Signs of Dullness
Reflection and IrregularityPros
Bright lines, isolated reflective spots, rounded areas, rolls, chips, and an inconsistent apex can reveal wear.
Cons
Glare, polish, focus error, and camera angle can imitate the same appearance.
Best For
Identifying sections that deserve closer inspection or cutting tests.
Common Signs of a Clean Edge
Continuity and Low ReflectionPros
A narrow continuous boundary, scratches reaching the edge, and no obvious chips or rolls support a well-formed apex.
Cons
A polished bevel can still end in a dull or poorly deburred apex.
Best For
Confirming visual consistency after sharpening.
Scratch Patterns and Edge Finish
Abrasives leave scratches whose direction, depth, spacing, and consistency provide clues about the sharpening process.
Visible coarse or medium scratches are not automatically defects. They may create useful microscopic tooth for tomato skin, peppers, meat, and fibrous foods.
The important questions are whether the scratches reach the apex consistently, whether earlier deep scratches were removed when required, and whether the finish suits the knife.
A polished bevel can be dull, while a visibly scratched working bevel can cut extremely well.
Burrs, Rolls, and Chips
These features may resemble one another until the blade, light, or viewing direction is changed.
Burr
A thin strip of weakened metal from sharpening may appear as a bright flap, wire, hook, or irregular extension.
Rolled Edge
The apex bends away from its centerline and may appear as a curved lip, bright ridge, fold, or shadow.
Chip
Missing steel may appear as a notch, cavity, jagged opening, or interrupted section of edge.
False Burr
Polish, compound residue, curved geometry, glare, or focus error can resemble attached metal.
False Chip
Dirt, corrosion color, marker ink, shadow, and poor focus can resemble missing steel.
Microdamage
- Very small defects may have little practical effect
- importance depends on size, location, frequency, and intended use.
Corrosion, Pitting, and Uneven Bevels
Corrosion can appear as discoloration, rough texture, cavities, or missing steel. Surface staining may be cosmetic, while pitting that reaches the apex can weaken the edge.
Bevel width may vary because blade thickness changes, the angle changes, pressure was uneven, previous repair altered the blade, or the original grind was asymmetrical.
A wider bevel does not automatically prove overgrinding, and unequal sides are not automatically incorrect. The knife’s design and cutting behavior must be considered before correcting an edge for appearance alone.
Before-and-After Comparisons
Before-and-after photographs are useful only when the setup is reasonably consistent.
Compare the same edge location, camera orientation, reproduction size, focus point, background, and lighting direction. The second photograph should not appear better merely because it is larger, brighter, more sharply focused, or photographed from a more favorable angle.
Useful improvement may include removal of chips and rolls, a more continuous apex, scratches reaching the edge consistently, reduced burr remnants, corrected heel contact, and a repaired tip.
What to Photograph
A complete record should represent more than one small section of the blade.
Heel
Shows whether the rear edge was reached and whether a bolster or recurve interferes.
Middle
Represents the section used for much routine cutting.
Tip
Reveals rounding, flattening, overgrinding, chips, and incomplete sharpening.
Both Sides
Helps distinguish burrs, rolls, asymmetry, and lighting artifacts.
Photo-Reading Checklist
Confirm which part and side of the edge is shown. Check whether the apex or only the bevel is in focus. Consider the direction and hardness of the light. Look for a scale reference or consistent image size. Rotate the knife or change the light before identifying a bright feature. Compare both sides when distinguishing a burr from a roll. Do not treat every dark spot as a chip. Do not judge sharpness from polish alone. Compare heel, middle, and tip. Use practical cutting tests and edge measurements alongside photographs.
Key Takeaways
Photos Need Context
Lighting, angle, focus, scale, and edge location determine what a close-up image actually shows.
Appearance Is Not Performance
A polished edge can be dull, while a visibly scratched working edge can cut extremely well.
Consistency Makes Comparisons Useful
Before-and-after photographs should use the same area, orientation, focus, lighting, and image scale.
References
The following sources were used in preparing and supporting this article.
Macro Photography: How to Look Sharp!
Canon U.S.A.
usa.canon.com
Macro Photography: Sculpting and Shaping Light
Canon U.S.A.
usa.canon.com
Why Do I Need to Hone My Tool After Sharpening?
Tormek
tormek.com
PT50 Series Edge Sharpness Testers and the BESS
Edge On Up
edgeonup.com